Enterprise HTTP Live Streaming Infrastructure Implementation
HTTP Live Streaming (HLS) represents Apple’s industry-leading adaptive bitrate streaming protocol designed for reliable media delivery across diverse network conditions and client platforms. Developed and released by Apple Inc. in 2009 HLS has achieved widespread adoption across media players web browsers mobile devices and streaming media servers establishing itself as the dominant streaming protocol for iOS and cross-platform applications.
The protocol architecture segments video content into discrete downloadable chunks typically 6-10 seconds in duration with multiple quality variants encoded at different bitrates. Client applications receive extended M3U playlist files (.m3u8) containing segment URLs and quality metadata enabling automatic adaptation to network conditions and device capabilities. This approach ensures optimal viewing experience while maintaining compatibility with firewalls and Content Delivery Networks (CDNs).
HLS provides significant advantages over legacy Flash-based streaming including native HTML5 video player support universal device compatibility and robust network adaptation capabilities. While typical latency ranges from 15-30 seconds for live streams the protocol excels in video-on-demand applications and scenarios requiring broad device compatibility. This comprehensive technical guide demonstrates production HLS server configuration on Windows enterprise platforms utilizing Internet Information Services (IIS) and FFmpeg integration for professional streaming deployment.
Step 1: Creation of the Web Server
Microsoft Internet Information Services (IIS) provides practical and widely-adopted web server infrastructure for HLS streaming implementation. The configuration process follows systematic procedures through standardized setup protocols:
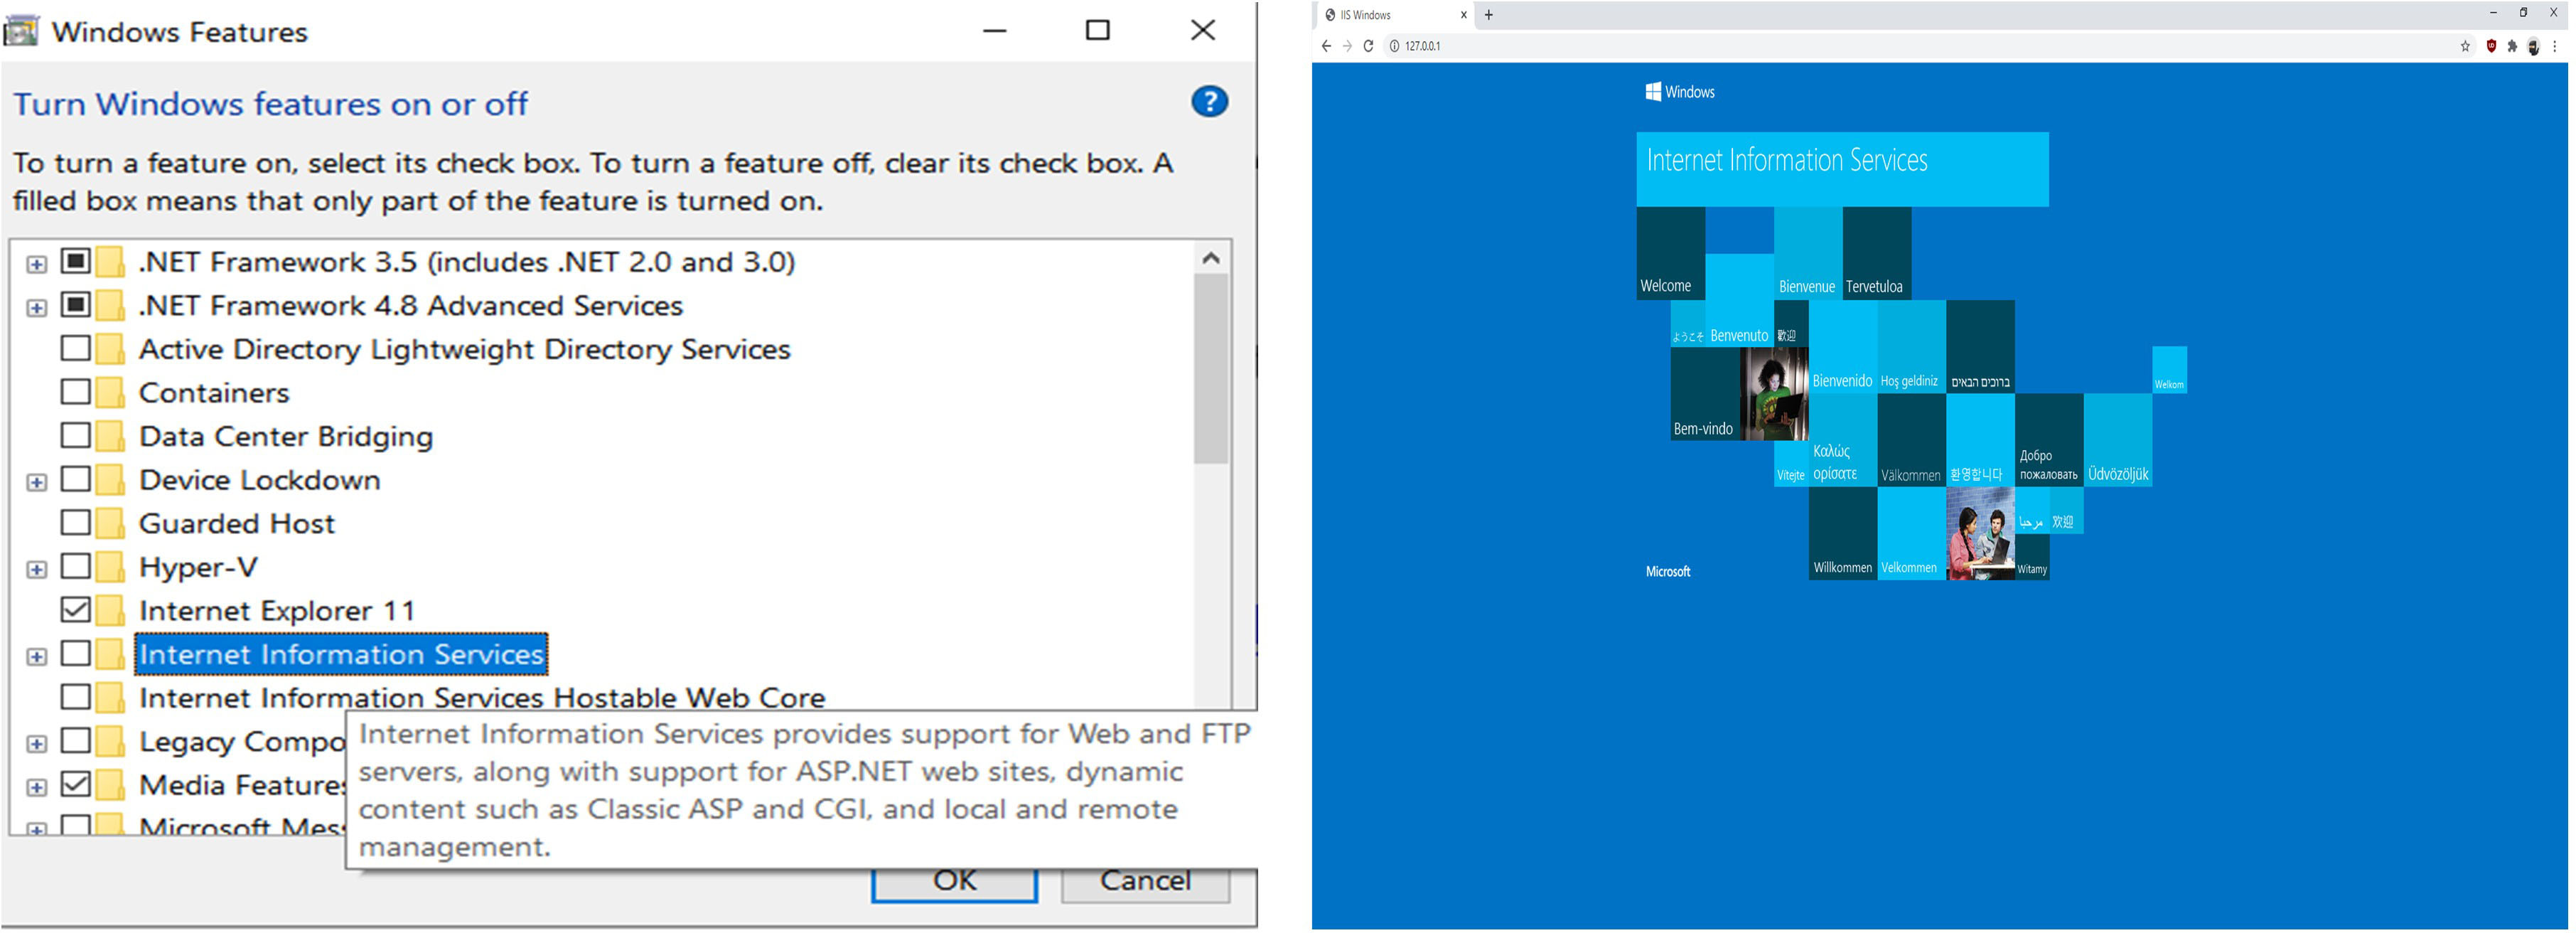
- Start by selecting and opening Windows features (WindowsKey+S (Search box) then type Turn Windows features on or off).
- Find Internet Information Services and Tick the box (Wait for the process to configure and then Close).
-
Test it by opening Chrome and navigating to your local internet address, 127.0.0.1.
- The default page should appear (If not, reboot your system).
Step 2: Change Default Physical Path
Optional Path Configuration: This step may be skipped for default installation preferences. All system files utilize the default path C:\inetpub\wwwroot\ for standard deployment
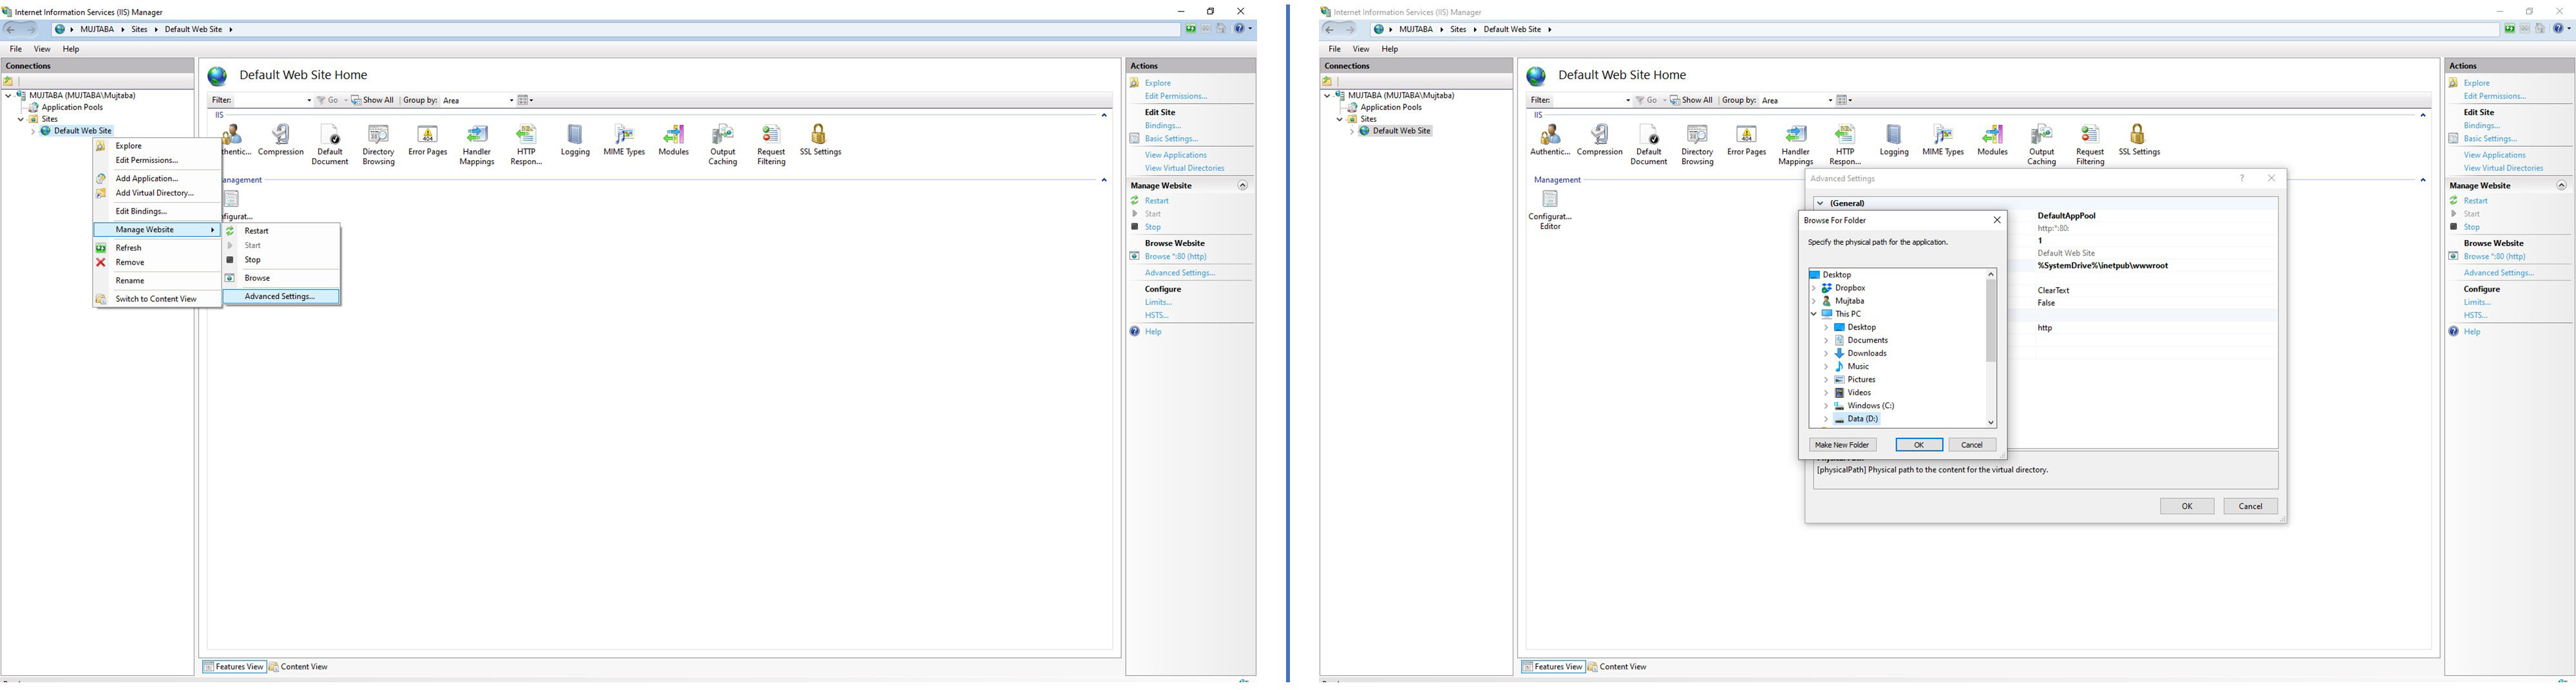
Open IIS Manager (WindowsKey+S, then type IIS). The Default Site stores its files in a particular directory. To expose this information, right-click on it, choose Manage Website, then Advanced Settings. This will open a pop-up window with all the default site information, such as files or document roots, as they are typically known, enabled protocols, and even bindings. If you click on Physical Path, a button will appear on its extreme right where you can choose a different document root.
Step 3: Enabling Cross-origin resource sharing (CORS)
To test streams, you must allow other websites to access files on your web server. However, not all modern browsers allow this by default due to security concerns. To allow this, you must explicitly tell the browser that you agree to a website to read data from your server. This is called cross-source resource sharing (CORS). To enable CORS to follow the below steps:
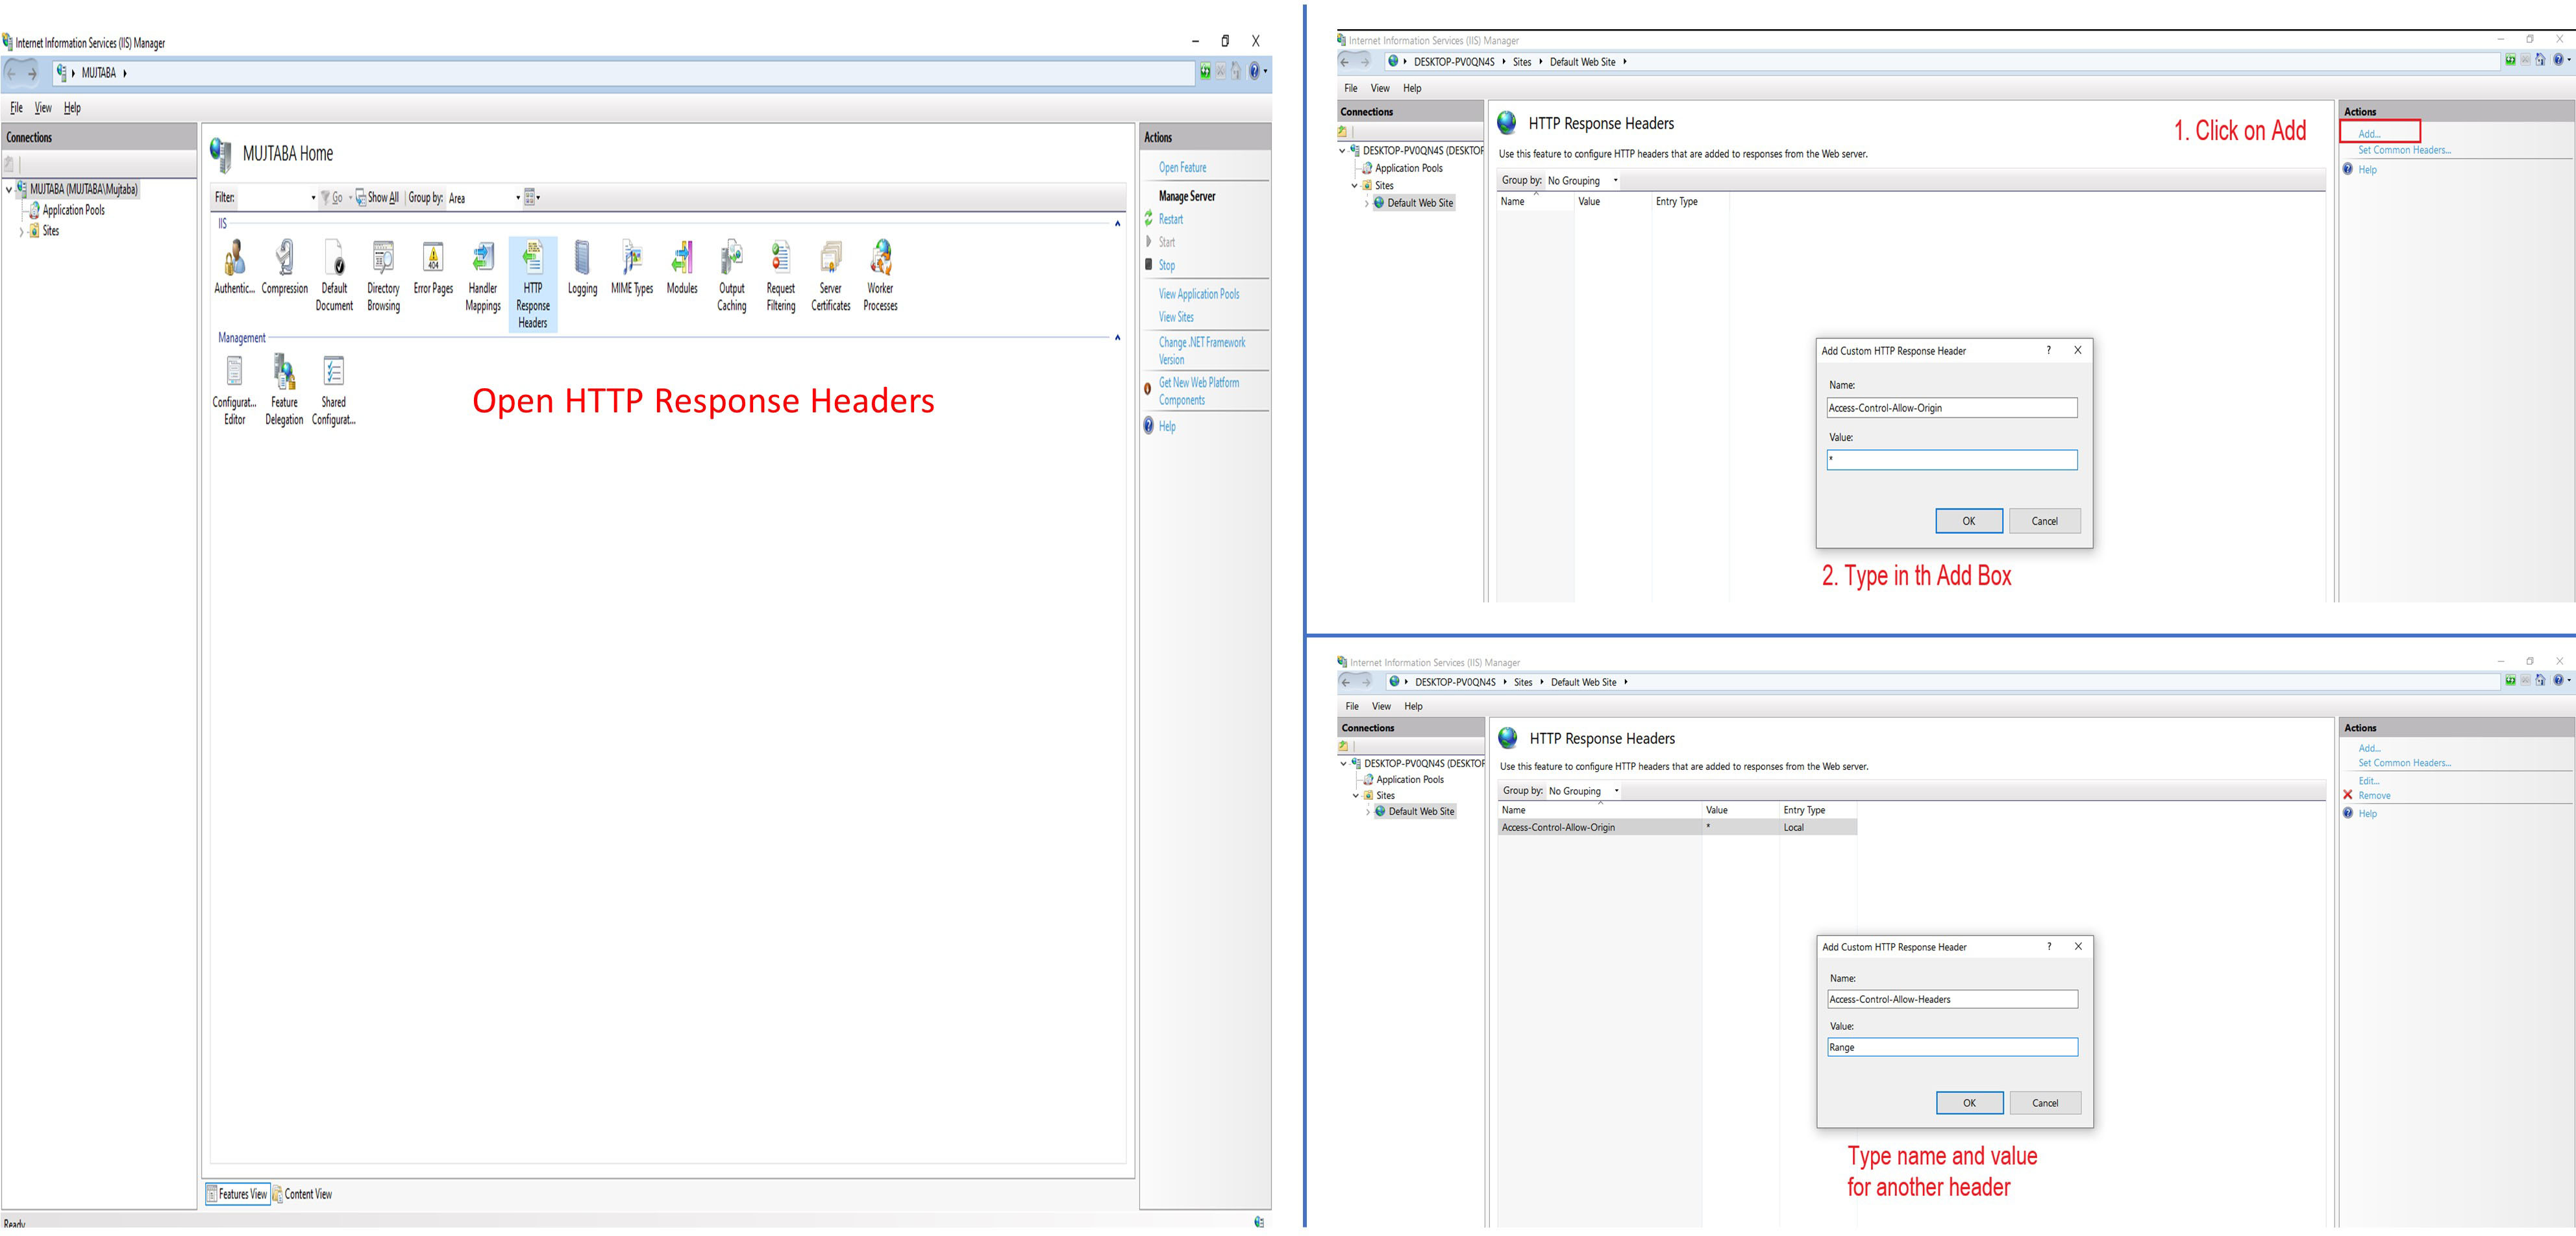
- Open the webserver (WindowsKey+S then type IIS).
- Select Default Web Site and Right Click or Double click HTTP Response Headers.
- Select Open Feature from the Action. Then, click Add and Type in Access-Control-Allow-Origin for Name and type “*” for Value.
- Click OK to add the header to add another value: type in Access-Control-Allow-Headers for Name; type in Range for Value.
Step 4: Adding the HLS MIME Type
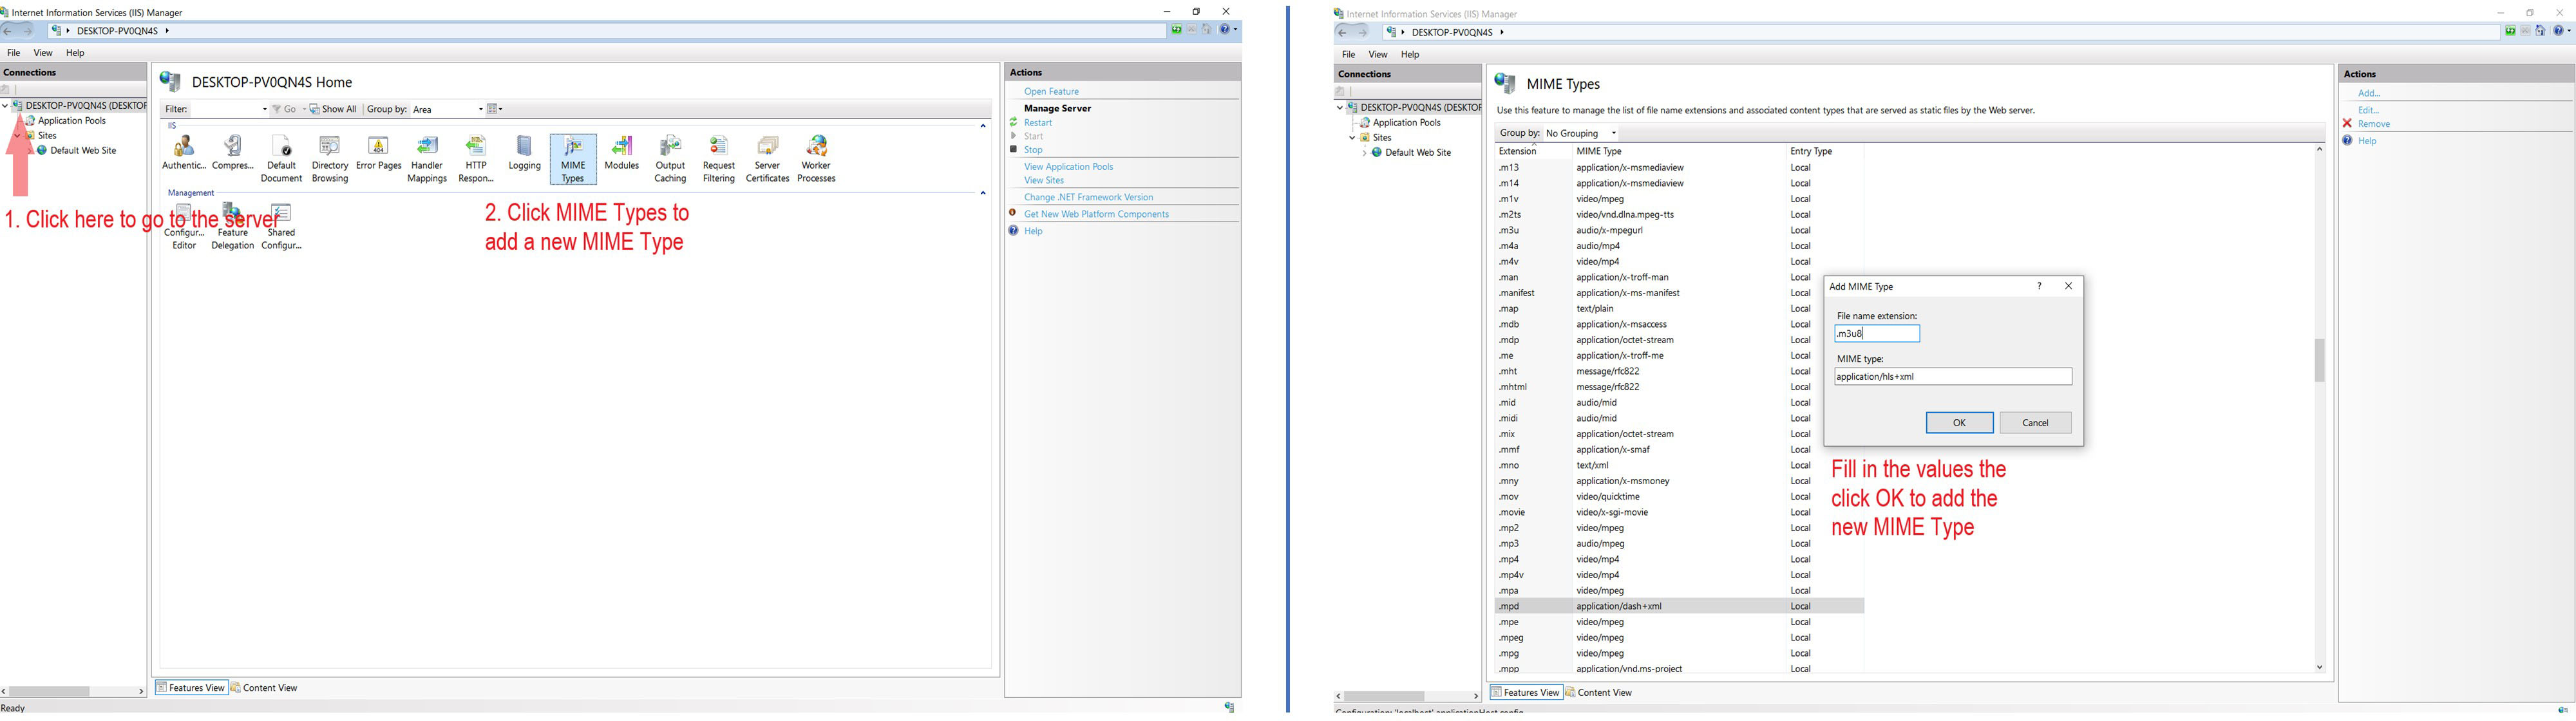
HLS requires statements to learn how to analyze video and audio files. HLS manifest file ends in .m3u8. Windows IIS does not know about this extension. So, for IIS to correctly send the file to the player, you need to add this extension to IIS.
Under connections click your server and double Click MIME Types
- Type .m3u8 for File name extension; type application/hls+xml for MIME-type
- Press okay.
Step 5: FFmpeg Installation
You can skip Step 5 and Step 6 by downloading a pre-processed video sample. After downloading the video place it into the default IIS physical path (i.e., C:\inetpub\wwwroot) or the modified path.
- Download FFmpeg from here.
- Extract the downloaded FFmpeg zip file to C:\ffmpeg.
- Navigate to the bin folder under C:\ffmpeg and copy the address using Ctrl+C.
- Open up the System information window and click on Advanced System Settings. Then click on Environment Variables.
- Select the Path variable under System variables.
- Click Edit. then click New.
- Type Ctrl+V to paste in the address where you extracted FFmpeg earlier. Then press OK.
Check Installation
Open cmd and type ffmpeg in the command prompt. If you see a lot of text in the cmd, your FFmpeg is installed successfully.
Step 6: Prepare Workspace
Use vid2tc to generate thumbnail containers and video segments from videos.
Or
- Download sample video BigBuckBunny.
- Rename the downloaded file to input.mp4
- Run the following command in the cmd in the same directory.
ffmpeg -i input.mp4 -force_key_frames "expr:gte(t,n_forced*10)" -strict -2 -c:a aac -c:v libx264 -f segment -segment_list_type m3u8 -segment_list_size 0 -segment_time 10.0 -segment_time_delta 0.1 -segment_list out.m3u8 out%02d.ts
- Once the process is completed, copy all the files excluding input.mp4 into the default IIS physical path (i.e C:\inetpub\wwwroot\) or the modified path.
To generate segments from multiple videos, clone the repository using the following command:
git clone https://github.com/iamgmujtaba/hls-server.git
Then run the following script:
python .\main.py -i .\input\ -o .\output\
Step 7: Final Testing
Check your IP Address
Open cmd and type ipconfig. Get IPv4 Address. It would be 192.XXX.XXX.XXX.
Play Video on HLS Player
VLC
- Install VLC.
- Open Network Stream by using Ctrl+N.
- Type the URL like this http://192.XXX.XXX.XXX/bbb/out.m3u8. bbb is the directory of the processed BigBuckBunny video and out.m3u8 is the HLS text file we created using the above script.
- Finally, press play. If you can watch the video, it means you have configured HLS on your window machine.
iPhone/iPad (Safari Web Browser)
If you have iPhone, open safari and type like this 192.XXX.XXX.XXX/bbb/out.m3u8. bbb is the directory of the processed BigBuckBunny video and out.m3u8 is the HLS text file we created using the above script. Please note the iPhone should be connected to the same WiFi network.
Ubuntu or Jetson Devices
Suppose you want to use a native HLS web player. In that case, you can clone hls.js from GitHub and follow the installation instructions.
The main code is available at GitHub.
Raise an issue if you are facing any problems.